Use the everRun Quick Start Guide to get your everRun system up and running as quickly as possible.
An everRun system requires two x86-64 host servers (referred to as physical machines, or PMs) that can support multiple virtual machines (VMs), and a remote management computer that can run the everRun Availability Console. This guide explains how to set up your PMs and guides you through the basic installation and start-up tasks, including:
You need the following items/information:
Stratus strongly recommends that your everRun system uses a storage RAID controller. The RAID controllers in an everRun system create logical disks from the system's physical disks, and the logical disks are then collected into a storage group. Configuration recommendations follow:
Attach the following cables:
The following illustration shows these connections:
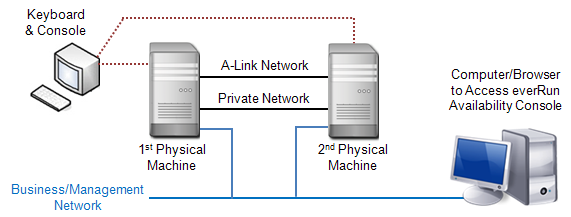
Obtain the ISO image and create a bootable medium:
Click everRun (if it is not already displayed) and then select the appropriate version. Scroll down to Product Downloads, and under Install, click the link to the appropriate ISO image (everRun_install-7.x.x.x-xxx.iso). Save the ISO image.
Create a bootable medium using the ISO image:
Occasionally an ISO file can be corrupted during the download process. You can choose to verify the installation medium during the software installation.
For additional information, see
Allow 60 to 90 minutes to complete the everRun software installation process.
As the PM powers on, configure the following settings in the firmware (BIOS or UEFI) setup utility:
Enable Execute-Disable Bit Capability.
From the installation software's Welcome screen, use the arrow keys to select an installation option. Stratus recommends that, for an initial installation, you select Verify medium and Install everRun, which verifies the installation medium before installing the software (verification adds about five minutes to the installation process). If you do not want to verify the medium, select Install everRun, Create a new system. After you select an option, press Enter.
If any disk contains previously installed data, the following message appears and the system reboots (if no disk contains previously installed data, installation continues with the next step):
When the reboot is complete, the boot menu reappears and you must, again, select an installation option (Step 1,c, above).
From the Select the method to configure ibiz0 screen, select Manual configuration (Static Address) and press F12.
If any disk contains previously installed data, the following message appears and the system reboots (if no disk contains previously installed data, installation continues with the next step):
When the reboot is complete, the boot menu reappears and you must continue with Step 2,c, above.
No action from you is necessary until after the second PM reboots. At that time, remove the bootable medium or unmount the ISO image, disconnect the keyboard/console, and log on to the everRun Availability Console.
From the remote management computer, type the IP address of node0 (primary) into a browser address bar.
The logon page of the everRun Availability Console appears. Enter admin for the Username and admin for Password, and then click LOGIN.
The Stratus everRun EULA appears. Read the EULA and click Accept to accept it.
The LICENSE INFORMATION window appears. Under Upload License Key, click Browse and navigate to the license .KEY file that you received from Stratus. Select the license file and click Upload.
For security, change the default user login name and password for the admin account on the Users & Groups page.
The everRun Availability Console appears. Bookmark or make note of the system IP address for use when logging in to the console in the future.
First, create a virtual CD (VCD) to make software installation media available to the virtual machine (VM).
Next, create a new virtual machine (VM) and install a guest operating system on your everRun system.
After you install the operating system, perform any other guest OS configuration tasks (for example, initializing disks and installing applications). For details, see
Product Support and Downloads
|
About Stratus
|
Product Documentation (PDF Format)
|
About Help
|